


 By: RISA
Guide To: Reviewing Your RISA-3D Model
When working with RISA-3D, a structural analysis and design software, it's...

RISA-3D is one of the most versatile structural modeling software platforms available today. Whether you’re just getting started or looking to sharpen your skills, this guide will walk you through key steps to accelerate your modeling process, along with tips and tricks that can help you streamline your workflow.
Before diving into modeling, take a moment to adjust your model settings. Tailoring these to your project needs from the outset will save you time and potential errors later on. Use RISA-3D toolbars to quickly access familiar tools, or add a custom button to your toolbar for frequently used features, improving your efficiency.
Ensure you understand the different code types and materials available in RISA-3D. This includes both historical codes and the most current standards. Taking just a few minutes to familiarize yourself with the correct selections can reduce modeling time and avoid code compliance issues later.
Once you’ve set your preferences, it’s time to begin general modeling. RISA-3D offers various options to create structural models with precision. Here are some essential tools to get you started quickly:
Drawing Members: Utilize the drawing tool to create your first members.
Snapping: Use snapping tools to align members perfectly within the model.
Adding Loads: Apply loads by simply selecting the appropriate load case. Use the graphical interface or the spreadsheet for this step.
Key Takeaway: focus on learning these foundational features first. From here, you can transition to larger and more complex models.
Once you're comfortable with the basics, expand your project. Let’s take a quick look at what you can achieve using these foundational tools by transitioning into a more complex model. For example, designing a Spaceship structure shows how simple commands can lead to intricate designs. Here’s how to manage complexity effectively:
Dynamic Views and Iso View: Switch between different perspectives to better visualize your model.
Selection State Options: Simplify large model management using tools like dimlock and saved selections, reducing clutter and speeding up adjustments.
Bulk Member Property Changes: Quickly update multiple members at once, streamlining revisions.
One of the big strengths of RISA-3D is the ability to switch between spreadsheet editing and graphical editing. The spreadsheet tools make managing large data sets easier than ever. Choose whichever method works best for you, whether it’s quickly modifying loads or adjusting member properties.
When it comes to loads, RISA-3D provides a flexible workflow:
Applying Loads Graphically: Visualize and modify applied loads easily in the graphical interface.
Load Combinations: Use auto-generated load combinations or create custom ones depending on your project needs. Avoid spending too much time over-explaining custom vs. envelope—experienced engineers will already understand the distinction.
Quick Tip: head over to the Design Tab of your Load Combinations spreadsheet to set load combinations based on the material or connection type.
With your model built and loads applied, it’s time to solve the model. RISA-3D offers multiple ways to run a solution, and once the analysis is complete, here’s how to approach results:
Graphical Results Display: Display the results visually for a clear, intuitive understanding of deflection, forces, and other key outcomes.
Results Spreadsheets: Dive deeper into detailed results through the spreadsheet format if needed, depending on your preferred approach.
Deflection Graphs and Reports: Highlight deflection graphs within the Detail Report, emphasizing transparency and clarity in your design solutions.
At this stage, you’ve done the heavy lifting—now it’s time to bring it all together by presenting results professionally. Here’s how:
Report and Print Results: Learn how to create professional reports using multiple methods. Adding sections to a report or creating a template file for future projects enhances professionalism.
By following these steps, you’ll find yourself working more efficiently in RISA-3D, whether you’re managing small projects or complex designs. With these tips and features, you’ll be on the fast track to mastering this powerful software! Take the next step using our Step-By-Step Tutorials below.
Sign up for one of RISA's other Live or On-Demand Training courses for RISA-3D!

When working with RISA-3D, a structural analysis and design software, it's...
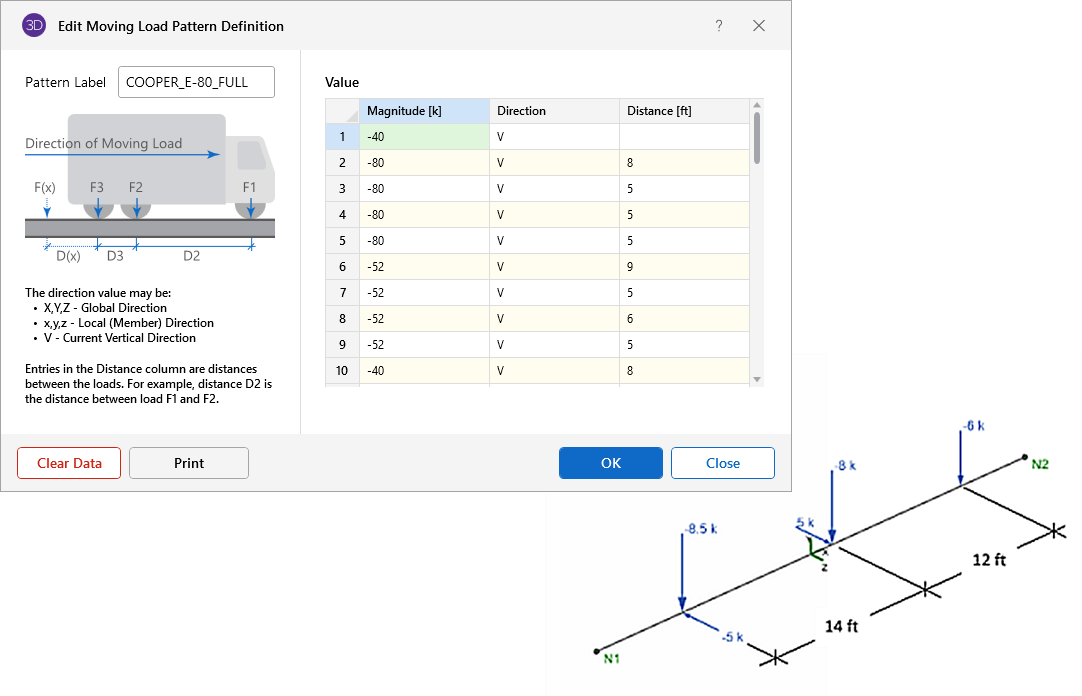
In RISA-3D, moving load results are generated by simulating a load that...

On January 24th, we celebrate the International Day of Education, a...