


Soil Properties in RISAFoundation
With Pile Design in RISAFoundation, you have the ability to define the...
A common mistake when modeling pile-supported slabs in RISAFoundation is forgetting to zero out the soil properties. By default, RISAFoundation assigns a soil definition to all slabs, which introduces soil springs into the model. If not adjusted, this can lead to unintended load distribution, where the slab is partially supported by both the soil and the piles. To ensure your slab is fully supported by piles as intended, you must modify the soil definition.
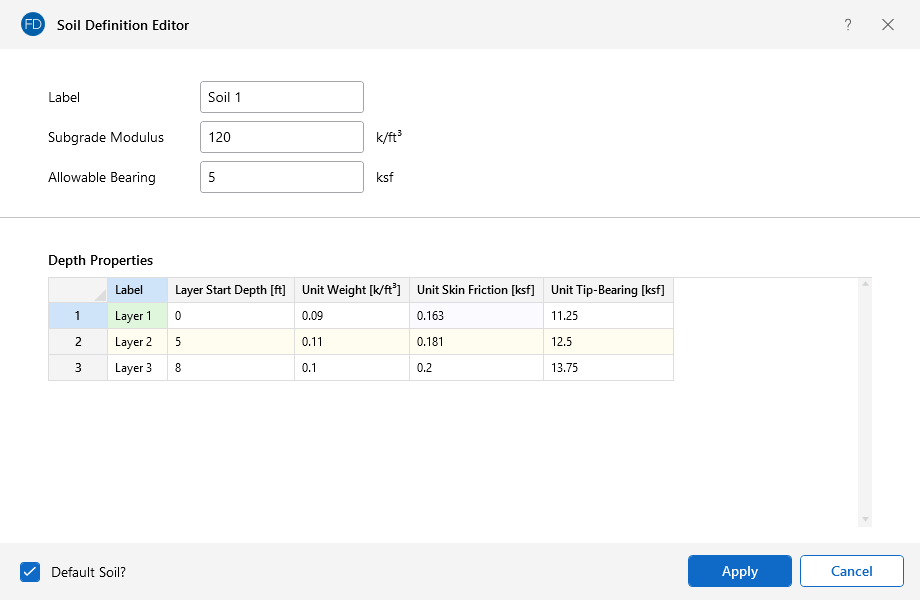
📝 Important Note: While you should zero out the Subgrade Modulus and Allowable Bearing Pressure, don’t forget to define the Soil Depth Properties! These depth properties are essential for pile design—without them, your piles won’t have the necessary soil interaction data. RISAFoundation won’t throw an error, but the soil in that region will be ignored. For more details on soil depth properties, check out this article: Soil Properties in RISAFoundation.

When defining a slab in RISAFoundation, the program automatically assigns a default soil definition, which includes a Subgrade Modulus and Allowable Bearing Pressure. If these values are left as-is, the slab will interact with the soil beneath it, causing unexpected load-sharing between the soil and the piles. This can lead to incorrect reactions at the pile locations and an inaccurate representation of how the slab is truly supported.
To properly model a slab that is only supported by piles, follow these steps:
Open the Soil Definitions Spreadsheet
Navigate to Soil Definitions in the Data Entry toolbar.
Modify the Soil Properties
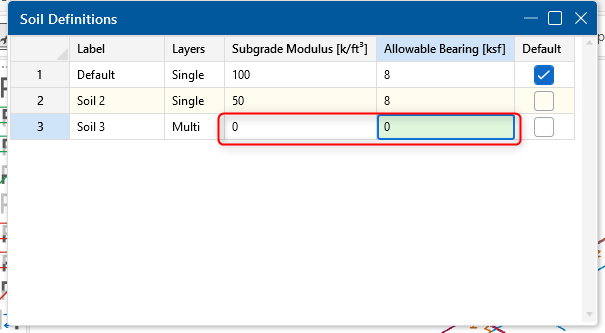
Locate the soil definition assigned to your slab.
Set the Subgrade Modulus to 0 k/ft^3 (or 0 kN/m³ in metric units).
Set the Allowable Bearing Pressure to 0 ksf (or 0 kPa). 
Confirm Slab Behavior
After updating the soil properties, verify that the slab is fully supported by the piles by reviewing the Reactions and Load Distribution in the Results.
Ensure that the expected loads are transferring directly into the piles without any unintended soil support.
Use Pile Reactions to Validate the Model
After running the analysis, review the pile reactions to confirm that all slab loads are being correctly transferred. If you still see load being carried by the soil, double-check the soil properties assigned to the slab.
Create a Custom Soil Definition
Instead of modifying the default soil, consider creating a separate “No Soil” definition with the Subgrade Modulus and Allowable Bearing Pressure set to zero. This way, you can easily apply it to any pile-supported slabs in future models.
With Pile Design in RISAFoundation, you have the ability to define the...
While RISAFoundation has a Default soil properties (Subgrade Modulus...
In RISAFoundation, the Allowable Soil Bearing value is controlled by...